Category: IT


Content Library Templates

Within the last two years I have had unfortunate circumstances where power issues or something else has caused hardware failure that resulted in some sort of corrupted data in my home lab. I swore the next time this happens I’d build a script that would help redeploy and configure my setup, mainly my Horizon environment.

Well.. I found that time again when I lost two drives in my vSAN three node NUCs. Not the vSAN’s fault that I bought cheap spinning disks, or that I waited too long to replace the first failed drive. But I’ve always treated my NUCs as throwaway environments that I can spin up and down anytime. My main Dell T710 hosts my vCenter, one of my domain controllers (plus DNS), my main Win10 jump box and a small Ubuntu docker host to play with other things. My NUCs are truly where I spun up vROps, vRLI and my VDI environments.

My first step was to create a new Content Library for the NUCs and create three VM Templates for 1) Windows 10 2) Server 2019 Standard and 3) Windows 2019 Datacenter needs. After installing off of the ISOs and doing the needed patching I did a Google search on how to use Powershell to update these VMs remotely so that I can automate this monthly. The below script is what I found from https://4sysops.com/archives/powershell-remoting-over-https-with-a-self-signed-ssl-certificate/ because Microsoft would prefer the remote and client hosts be on the same domain. In my case I’m going with best practices and leaving my Templates out of the domain so I don’t have to deal with Trust issues later. You have to start off with building that Self Signed Cert and the Windows Remote Management services to leverage HTTPS as the transport mechanism. The commented lines are for the Powershell host where you need to import the newly created Self Signed Certs into the cert store.

# https://4sysops.com/archives/powershell-remoting-over-https-with-a-self-signed-ssl-certificate/

# Below on Remote/Template VMs

$Cert = New-SelfSignedCertificate -CertstoreLocation Cert:\LocalMachine\My -DnsName $env:COMPUTERNAME
mkdir c:\temp
Export-Certificate -Cert $Cert -FilePath C:\temp\$env:COMPUTERNAME
Enable-PSRemoting -SkipNetworkProfileCheck -Force
dir wsman:\localhost\listener
Get-ChildItem WSMan:\Localhost\listener | Where -Property Keys -eq "Transport=HTTP" | Remove-Item -Recurse
Remove-Item -Path WSMan:\Localhost\listener\listener* -Recurse
New-Item -Path WSMan:\LocalHost\Listener -Transport HTTPS -Address * -CertificateThumbPrint $Cert.Thumbprint –Force
New-NetFirewallRule -DisplayName "Windows Remote Management (HTTPS-In)" -Name "Windows Remote Management (HTTPS-In)" -Profile Any -LocalPort 5986 -Protocol TCP
Set-Item WSMan:\localhost\Service\EnableCompatibilityHttpsListener -Value true
Set-NetConnectionProfile -NetworkCategory Private
Disable-NetFirewallRule -DisplayName "Windows Remote Management (HTTP-In)"

# Below on Client/Host Management Powershell
# Import-Certificate -Filepath "S:\certs\DESKTOP-KPQJPMS" -CertStoreLocation "Cert:\LocalMachine\Root"
# Import-Certificate -Filepath "S:\certs\WIN-1DBMFPA2ND2" -CertStoreLocation "Cert:\LocalMachine\Root"
# Import-Certificate -Filepath "S:\certs\WIN-93OI9TU9IFP" -CertStoreLocation "Cert:\LocalMachine\Root"

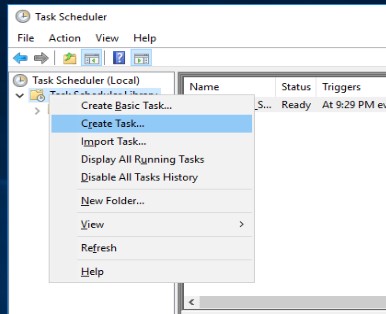
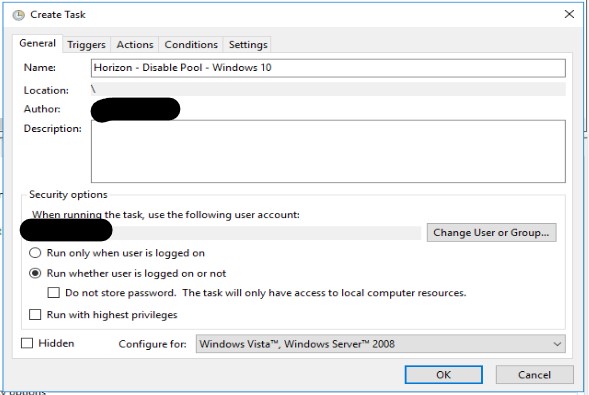
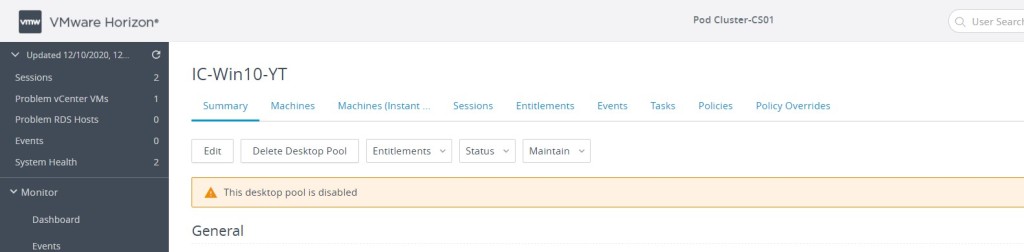
Now what I did was create the Windows Task Scheduler on my Powershell host that you will later use the invoke-command to trigger the task to start the Windows Updates to check for, update and reboot. I then exported that task so I wouldn’t have to set it up manually again and can use the top of the script to automatically create by importing for me (which is the first commented out line.) Then I create my variables for the three VMs that we will use as our Templates in the Content Library that we will actually delete every month and upload the new VMs instead. But by defining the same name each time I can create other scripts, like automating the deployment of my Horizon Connection Servers. I do always include how I create my credential (.cred) files but comment them out so that if I end up rebuilding my Powershell host I can easily redo those tasks.

# This script requires a Task Scheduler instance setup to do the download and install of Windows patches. This is due to security policies
# in place that you cannot download anything while in a remote session.  So for each new Master Image be sure to create this which can be done 
# once then export it to a file share and run this command so it's the same in each VM.
#
# schtasks /create /xml "\\192.168.1.95\share\Scripts\Download Windows Updates.xml" /tn "Windows Download and Install Updates" /ru "Administrator" /rp "yourpassword"
# 
# For Windows 10 make sure Windows Remote Management is running as a service, set start automatically in each Master Image VM.
#
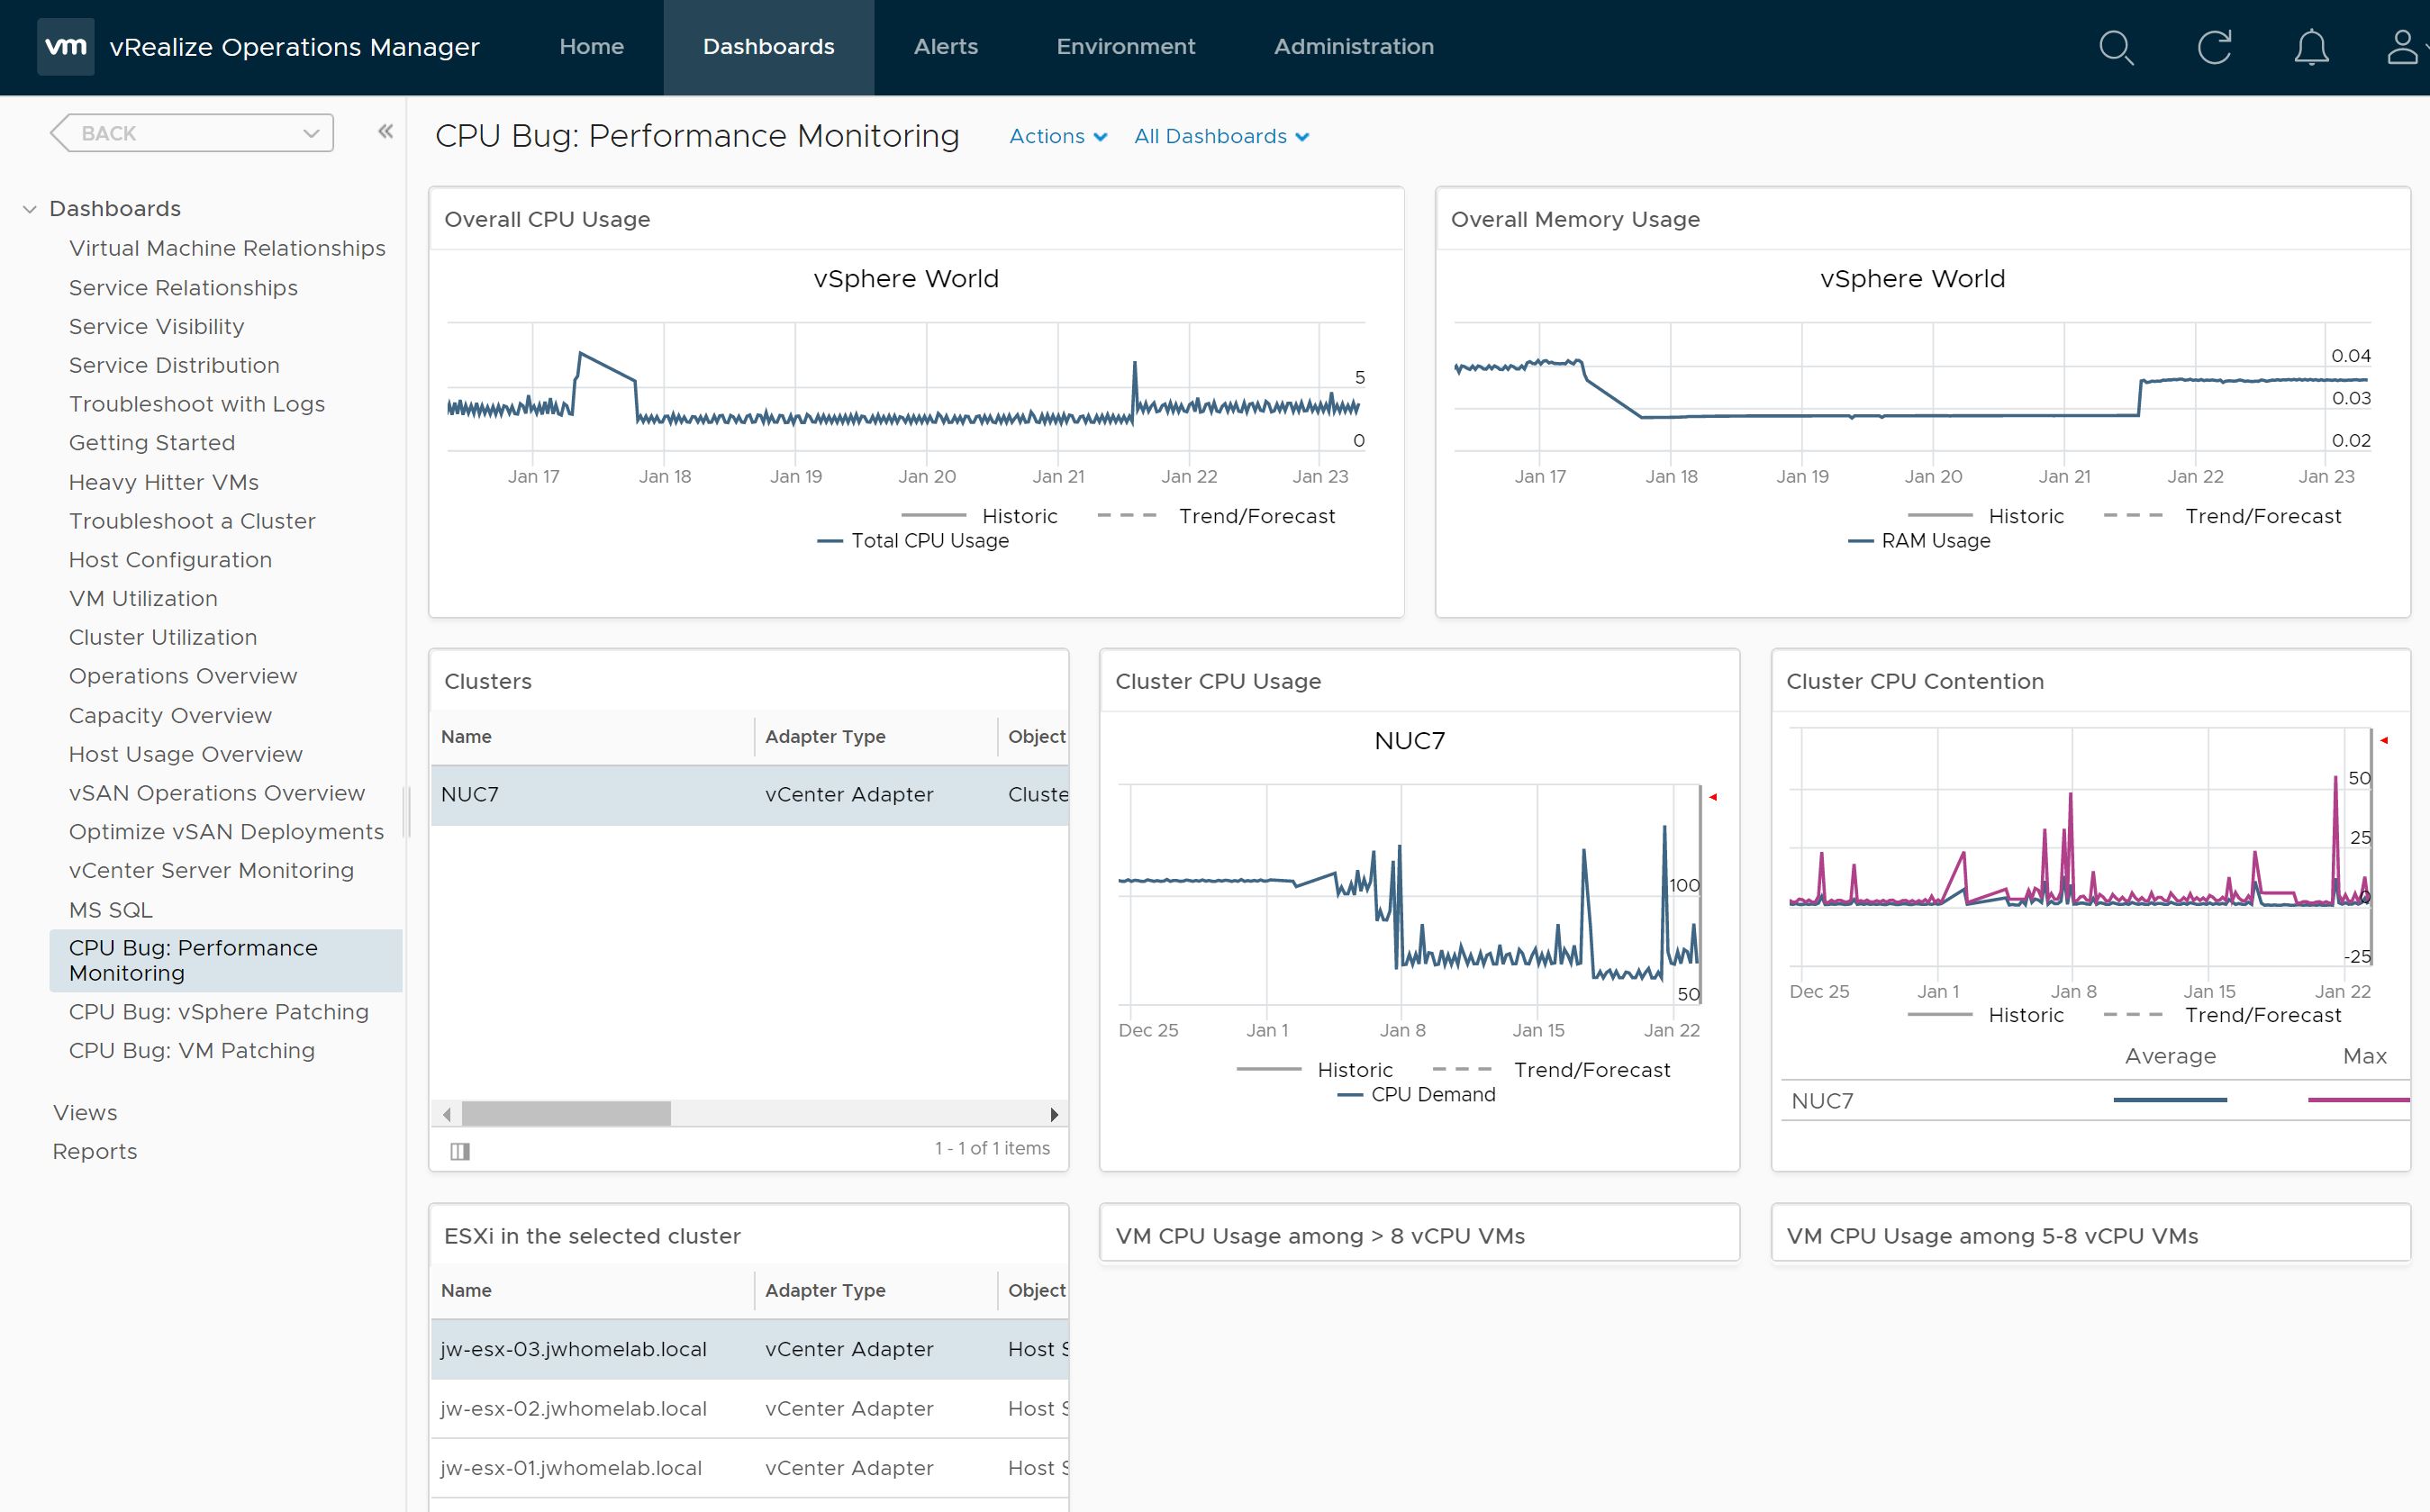
# Also change the default web operation timeout from the 300 seconds to -1 to be infinite or to another larger timeout. In my case my home lab NUCs are slow disks so 
# the default 5 mins wasn't long enough and would throw an error but the task would complete within vCenter.  
# Set-PowerCLIConfiguration -WebOperationTimeoutSeconds -1 and then restart the powershell window.
#

#region Variables
$vc = "jw-vcenter.iamware.net"
$Server2019DC = "Server2019-DC"  # Content Library Item Name
$Server2019DCVM = "Server2019-DataCenter" # VM Name
$Server2019STD = "Server2019-STD"  # Content Library Item Name
$Server2019STDVM = "Server2019-Standard" # VM Name
$Win10GI = "Win10-Gold-Image"  # Content Library Item Name
$Win10GIVM = "Win10-IC-Parent" # VM Name
$contentlibrary = "NUC-ContentLibrary"
$cluster = "vSAN-Cluster"
$vmhost = "jw-esx-01.iamware.net"
$vmfolder = "Template-Masters"


# I leave these processes in my scripts so I can create the credential file when needed on new PS host but keep the lines commented out except for import line that is needed.
#$localcred = get-credential # For non-domain user needs
#$localcred | Export-Clixml -path S:\scripts\localcred.cred
$localcred = Import-Clixml -path S:\scripts\localcred.cred
# Save vCenter credentials - Only needs to be ran once to create .cred file.
# $credential = Get-Credential # Can be a service account or domain user
# $credential | Export-Clixml -path S:\scripts\jw-vcenter.cred
# Import cred file
$credential = import-clixml -path S:\scripts\jw-vcenter.cred
#endregion

#region Let's get started!
# Connect to vCenter with saved creds
Write-Host "Connecting to $vc"
connect-viserver -Server $vc -Credential $credential

# Get list of VMs based upon folders in vCenter
$vmservers=get-vm -location (Get-Folder -Name Template-Masters)
$vmservers | select Name | export-csv s:\scripts\templates-masters.csv -NoTypeInformation
$servers = import-csv S:\scripts\templates-masters.csv | Select -ExpandProperty name
Write-Host "Starting $servers on $vc"
Start-VM -VM $servers

function Start-Sleep($seconds) {
    $doneDT = (Get-Date).AddSeconds($seconds)
    while($doneDT -gt (Get-Date)) {
        $secondsLeft = $doneDT.Subtract((Get-Date)).TotalSeconds
        $percent = ($seconds - $secondsLeft) / $seconds * 100
        Write-Progress -Activity "Sleeping.." -Status "Powering on VMs.." -SecondsRemaining $secondsLeft -PercentComplete $percent
        [System.Threading.Thread]::Sleep(500)
    }
    Write-Progress -Activity "Waiting.." -Status "Letting the OS boot.." -SecondsRemaining 0 -Completed
}

# Sleep for 5 minutes to give the OS time to customize.
Start-Sleep 300

Get-VM -location (Get-Folder -Name Template-Masters) | Select Name, @{N="IP Address";E={@($_.guest.IPAddress[0])}} | Format-Table -HideTableHeaders

# IPs for Master Images used for templates - you may want to reserve the IP and MAC so doesn't change in future.
$IP1 = (Get-VM -Name $Server2019DCVM | Select @{N="IP";E={@($_.guest.IPAddress[0])}} | Format-Table -HideTableHeaders | Out-String).Trim()
$HostName1 = (Get-VM -Name $Server2019DCVM | Select @{N='FQDN';E={$_.ExtensionData.Guest.IPStack[0].DnsConfig.HostName}} | Format-Table -HideTableHeaders | Out-String).Trim()
$IP2 = (Get-VM -Name $Win10GIVM | Select @{N="IP";E={@($_.guest.IPAddress[0])}} | Format-Table -HideTableHeaders | Out-String).Trim()
$HostName2 = (Get-VM -Name $Win10GIVM | Select @{N='FQDN';E={$_.ExtensionData.Guest.IPStack[0].DnsConfig.HostName}} | Format-Table -HideTableHeaders | Out-String).Trim()
$IP3 = (Get-VM -Name $Server2019STDVM | Select @{N="IP";E={@($_.guest.IPAddress[0])}} | Format-Table -HideTableHeaders | Out-String).Trim()
$HostName3 = (Get-VM -Name $Server2019STDVM | Select @{N='FQDN';E={$_.ExtensionData.Guest.IPStack[0].DnsConfig.HostName}} | Format-Table -HideTableHeaders| Out-String).Trim()

Add-HostFileEntry -hostname $Hostname1 -ipaddress $IP1
Add-HostFileEntry -hostname $Hostname2 -ipaddress $IP2
Add-HostFileEntry -hostname $Hostname3 -ipaddress $IP3

#endregion This is just the beginning..

# For testing purposes to make sure I can still connect to the 3 OS instances and verify there are Updates to install.
invoke-command -ComputerName $Hostname1 -scriptblock {get-windowsupdate} -UseSSL -Credential $localcred
invoke-command -ComputerName $Hostname2 -scriptblock {get-windowsupdate} -UseSSL -Credential $localcred
invoke-command -ComputerName $Hostname3 -scriptblock {get-windowsupdate} -UseSSL -Credential $localcred

#region Let's update the first master image..
Write-Host "Connecting to $Server2019DCVM and running Task Scheduler to download and install recent updates.."
Invoke-Command -ComputerName $Hostname1 -ScriptBlock {
schtasks /Query /TN "Windows Download and Install Updates"
Install-Module -Name PSWindowsUpdate -Confirm:$false -Force
Get-WindowsUpdate

Start-ScheduledTask -TaskName "Windows Download and Install Updates"

function Start-Sleep($seconds) {
    $doneDT = (Get-Date).AddSeconds($seconds)
    while($doneDT -gt (Get-Date)) {
        $secondsLeft = $doneDT.Subtract((Get-Date)).TotalSeconds
        $percent = ($seconds - $secondsLeft) / $seconds * 100
        Write-Progress -Activity "Sleeping.." -Status "Waiting for Windows Updates to install.." -SecondsRemaining $secondsLeft -PercentComplete $percent
        [System.Threading.Thread]::Sleep(500)
    }
    Write-Progress -Activity "Sleeping.." -Status "Applying new patches and updates.." -SecondsRemaining 0 -Completed
}


Start-Sleep 600
} -UseSSL -Credential $localcred
#endregion

#region Here's the second master image..
Write-Host "Connecting to $Win10GIVM and running Task Scheduler to download and install recent updates.."
Invoke-Command -ComputerName $Hostname2 -ScriptBlock {
Start-Sleep -seconds 5
schtasks /Query /TN "Windows Download and Install Updates"
Install-Module -Name PSWindowsUpdate -Confirm:$false -Force
Get-WindowsUpdate
Start-ScheduledTask -TaskName "Windows Download and Install Updates"

function Start-Sleep($seconds) {
    $doneDT = (Get-Date).AddSeconds($seconds)
    while($doneDT -gt (Get-Date)) {
        $secondsLeft = $doneDT.Subtract((Get-Date)).TotalSeconds
        $percent = ($seconds - $secondsLeft) / $seconds * 100
        Write-Progress -Activity "Sleeping.." -Status "Waiting for Windows Updates to install.." -SecondsRemaining $secondsLeft -PercentComplete $percent
        [System.Threading.Thread]::Sleep(500)
    }
    Write-Progress -Activity "Sleeping.." -Status "Applying new patches and updates.." -SecondsRemaining 0 -Completed
}


Start-Sleep 600
} -UseSSL -Credential $localcred
#endregion

#region Last master image
Write-Host "Connecting to $Server2019STDVM and running Task Scheduler to download and install recent updates.."
Invoke-Command -ComputerName $Hostname3 -ScriptBlock {
Start-Sleep -seconds 5
schtasks /Query /TN "Windows Download and Install Updates"
Install-Module -Name PSWindowsUpdate -Confirm:$false -Force
Get-WindowsUpdate
Start-ScheduledTask -TaskName "Windows Download and Install Updates"

function Start-Sleep($seconds) {
    $doneDT = (Get-Date).AddSeconds($seconds)
    while($doneDT -gt (Get-Date)) {
        $secondsLeft = $doneDT.Subtract((Get-Date)).TotalSeconds
        $percent = ($seconds - $secondsLeft) / $seconds * 100
        Write-Progress -Activity "Sleeping.." -Status "Waiting for Windows Updates to install.." -SecondsRemaining $secondsLeft -PercentComplete $percent
        [System.Threading.Thread]::Sleep(500)
    }
    Write-Progress -Activity "Sleeping.." -Status "Applying new patches and updates.." -SecondsRemaining 0 -Completed
}

Start-Sleep 600
} -UseSSL -Credential $localcred
#endregion

#region Now to restart the VMs..
# Restart VMs to get a clean system
Write-Host "Rebooting $servers to clear up any last update installs.."
Restart-VMGuest -VM $servers
Start-Sleep 600
#endregion

#region Now to shutdown the VMs..
# Shutdown VMs
Write-Host "Shutting down $servers on $vc.."
Shutdown-VMGuest -VM $servers -Confirm:$false

function Start-Sleep($seconds) {
    $doneDT = (Get-Date).AddSeconds($seconds)
    while($doneDT -gt (Get-Date)) {
        $secondsLeft = $doneDT.Subtract((Get-Date)).TotalSeconds
        $percent = ($seconds - $secondsLeft) / $seconds * 100
        Write-Progress -Activity "Sleeping.." -Status "Cleanly doing an OS shutdown.." -SecondsRemaining $secondsLeft -PercentComplete $percent
        [System.Threading.Thread]::Sleep(500)
    }
    Write-Progress -Activity "Sleeping.." -Status "Waiting for VMs to safely complete the shutdown process.." -SecondsRemaining 0 -Completed
}

Start-Sleep 300 # Giving the OS enough time to safely shutdown.
#endregion

#region Now to update the Content Catalog
# First we need to delete the original VM Templates since there isn't an update feature for VMs.
Remove-ContentLibraryItem -ContentLibraryItem $Server2019STD -Confirm:$false
Remove-ContentLibraryItem -ContentLibraryItem $Server2019DC -Confirm:$false
Remove-ContentLibraryItem -ContentLibraryItem $Win10GI -Confirm:$false
New-ContentLibraryItem -ContentLibrary $ContentLibrary -Name $Server2019DC -VM $Server2019DCVM -Location $vmhost -VMTemplate -InventoryLocation $vmfolder
New-ContentLibraryItem -ContentLibrary $ContentLibrary -Name $Server2019STD -VM $Server2019STDVM -VMTemplate -Location $vmhost -InventoryLocation $vmfolder
New-ContentLibraryItem -ContentLibrary $ContentLibrary -Name $Win10GI -VM $Win10GIVM -VMTemplate -Location $vmhost -InventoryLocation $vmfolder
#endregion

Be on the look out for future TAM Lab YouTube series where I’ll go over these scripts. I may do a screen capture and speed up the video to prove how well this works.

Internally there’s been more requests on how to do these automation tasks with a script, which is awesome that we can do this with Horizon starting on version 7 and more APIs coming out in 8/2006. Previously I showed how to create Instant Clone Pools, how to update them with a latest Snapshot and other tasks. But a common one for some customers, maybe call centers or even education, is how to enable and disable a desktop pool at any given time of day. This would be a great feature *hint hint* for Horizon to be able to schedule this but for now we can do this with PowerShell and a Task Scheduler to kick off.

I always start my scripts off with this so that I don’t have to type in my credentials every time for vCenter Access. But in this script we technically don’t need vCenter access since we are not doing any tasks related to infrastructure layer so you could remove it to keep it clean. This will also import the Horizon Module and defines variables for the Active Directory domain, vCenter and Connection Server.

$hzDomain = "AD_Domain.net"
$hzConn = "cs01.AD_Domain.net"
$vc = "vcenterAD_Domain.net"
$PoolName = "Win10 Pool"
# Import the Horizon module
Import-Module VMware.VimAutomation.HorizonView
# Save vCenter credentials - Only needs to be ran once to create .cred file.
# $credential = Get-Credential
# $credential | Export-Clixml -path c:\location\scripts\user-vcenter.cred # This saves your username and password in an encrypted file and saves time for automation processes.  Be mindful of access obviously for security reasons.
$credential = import-clixml -path C:\location\scripts\user-vcenter.cred # If above 2 lines have been ran and that file is still available comment out those 2 and uncomment this one.
# Connect to vCenter with saved creds
Connect-viserver -Server $vc -Credential $credential

Now we need to connect to the Horizon Connection Server and define a services variable:

# Establish connection to Connection Server
$hzServer = Connect-HVServer -server $hzConn -Domain $hzDomain -Credential $credential # If the Horizon credentials are the same as vCenter then we can use the same file, if not create a second one like $horizCreds instead.
# Assign a variable to obtain the API Extension Data
$hzServices = $Global:DefaultHVServers.ExtensionData

Now to get to the real purpose of this post. Enable or Disable an already created Desktop Pool.

# Set Pool Status as Disabled
Set-HVPool -PoolName $PoolName -Disable
# Set Pool Status as Enabled
# Set-HVPool -PoolName $PoolName -Enable

That’s it for code. Crazy, now you need to use a server to schedule this to kick off on certain times and days. The Connection Server is already running Windows Server so in my Home Lab I’m going to use it. In a production environment maybe you have a secure host that you can keep your scripts on and has access to run these commands off of for vCenter and/or Connection Server. I’m sure Security minded people will be able to assist with a proper way to protect this setup.

Create a task to run the PowerShell scripts to enable and another task to disable at different times of the day.

Open up Task Scheduler and Create Task..

Name it according to which ever task you are running. Also might put a Pool Name to help determine which pool if you have multiple to automate.

Be Sure to also run this under a service account with access to the folder where the scripts and .cred file is located. You must choose “Run whether user is logged on or not” as well.

For Trigger:

Select “On a schedule” and then based upon your needs either Daily or Weekly for certain days of the week as well as the desired time.

For Action:

Select “Start a program” in the drop down then enter in “powershell” for the Program/Script location but under the “Add arguments” enter in -File C:\location\scripts\name-of-script.PS1

Then verify the rest of the default settings for your setup. After pressing OK again it’ll prompt you to enter in the password for the service account you will be using.

You should have at least two tasks now, one to enable and one to disable.

You should test (preferably a pool that can be disabled during this time) that your scripts and tasks are working together. You can see my IC-Win10-YT pool that I’m testing with is disabled by the prompt.

Next I verified by running the task to enable the pool. It may take 5 or so seconds but refresh the Task Scheduler and verify that the task completes successfully by the Last Run Result field will say “The operation completed successfully. (0x0)”

Refresh the pool page under the Horizon Admin console and the “This desktop pool is disabled” warning is now gone.

I hope this helped you but if you have any questions, comments or feedback please let me know. I’m not an expert on scripting but I can fumble around.

Recently I wanted to automate some processes in my homelab environment that take longer than 5 minutes to do. One of the tasks is I have about 8 VMs that I deemed “non-essential” that I don’t need running 24/7 so I’d like to let that compute resources and power to be saved for those other VMs that I do want running, in this case I’ve been a part of the VMware Folding@Home team. I have one, 2 vCPU VM running per Intel NUC that if I power on all my VMs in that cluster I end up starving each other and tend to take longer to do work.

Below is the script to shutdown the guest cleanly based upon the VM folder “Non-Essential-Services” that I created within vCenter. It starts off with creating a credential file that protects my password without having to type it in every time. Then it pulls a list of VMs that are in a power on state currently and exports that to a CSV file that we will use later. Finally it sends a clean shutdown command to the guest OS.

# Script to shutdown the guest OS on several VMs - Will be used to power down homelab at night.
# Save vCenter credentials - Only needs to be ran once to create .cred file.
# $credential = Get-Credential
# $credential | Export-Clixml -path c:\path\to\folder\scripts\vcenter.cred
# Import cred file
$credential = import-clixml -path c:\path\to\folder\scripts\vcenter.cred
# Connect to vCenter with saved creds
connect-viserver -Server vcenter.fqdn.com -Credential $credential
# Get list of VMs based upon folders in vCenter
$vmservers=get-vm -location (Get-Folder -Name Non-Essential-Services) | Where {$_.PowerState -eq "PoweredOn"} 
$vmservers | select Name | export-csv c:\path\to\folder\scripts\non-essential-services.csv -NoTypeInformation
$vmservers | Shutdown-VMGuest -Confirm:$false

Below is the Power on script based only on the VMs that the shutdown script exported the night before. Again I commented out the credential part but wanted to keep it in so if something happens I can redo it easily. Then it imports that CSV file of VMs and then powers just those back on.

# Script to power on the guest OS on several VMs - Will be used to power on non-essential VMs that were powered down at night.
# Save vCenter credentials - Only needs to be ran once to create .cred file.
# $credential = Get-Credential
# $credential | Export-Clixml -path c:\path\to\folder\scripts\vcenter.cred
# Import cred file
$credential = import-clixml -path c:\path\to\folder\scripts\vcenter.cred
# Connect to vCenter with saved creds
connect-viserver -Server vcenter.fqdn.com -Credential $credential
# Import the night before list of VMs that were automatically powered off
$servers = import-csv c:\path\to\folder\scripts\non-essential-services.csv | Select -ExpandProperty name
Start-VM -VM $servers

Now you can easily run these by launching the script or what I plan on doing is using Task Scheduler from one of my Windows servers to perform this on a daily routine. If you have other ideas, hit me up.

I’ve been slacking on blogging since I joined VMware.  Not because I don’t want to, but mostly because i’ts been a great (and busy) opportunity to get out there as a Technical Account Manager and help customers.  I never really introduced myself in my blog.

Born and raised in Moore, Oklahoma.  I am a father of 5 kids, 2 boys and 3 girls, and they are my life.  My older son just got accepted into the pre-engineering class at the local Moore-Norman votech and we couldn’t be more proud of him.  Been married for 17 years this August 2020.  My family is the most important thing to me and honestly I owe my livelihood to them.

My technical career started right after I graduated high school at the local community college.  Hired to help with the manual labor side of replacing their lab and classroom computers but that was just the beginning.  After a year I was hired full time (yay benefits!) to be one of the five that supported the whole campus desktops.  Six months later I was given a chance to move into the server side and just like that my profession took off.  Never stop learning is a motto I recommend to everyone in any field.  If I just became complacent I would have never been able to move onto another opportunity at a local university hospital.  And boy was I glad I did.  They allowed me to dive deeper into my virtualization career and that seed that started at the first place, grew into a beautiful tree that has taken care of my family and introduced some of my best friends.  I cannot thank my previous employer enough.  They even let me lead the VMware User Group in OKC for about 2.5 years before I joined VMware directly.

If you would like to follow up with me you can find me at Twitter (@joey_vm_ware) or LinkedIn.  Or see me in person at the next OKC VMUG.

jw-headshot

VMware Horizon Scripting

automate-all-things

If you’ve been using Horizon for days to years, you know it’s not that hard to use but still it can be annoying to click so many times to create a pool or update an image.  I lost count after 30+ clicks, any where from changing a drop down to clicking next, next.. just to create a new pool.  Pushing an updated image to an already created pool was still around 6 or so.  Now I’m not dissing the UI, it’s still alot better than some other products and the HTML5 console is better than the Flash, but time is money.

(Oh and making sure everything is consistent is the real goal.) 

Now enter in the VMware.Hv.Helper module for Powershell.  You can download it and many others here at the Github link.  Open the psm1 module file with your preferred editor and there’s a TON of examples and the parameters are detailed like crazy.  Definitely well done.

example-ss

Steve Tilkens, a fellow TAM, started this TAM LAB internally to help others deploy new or setup new products or walk through on other software that our customers are using today.  One of the requests we were given is Day 2 Operations for Horizon and if it wasn’t given I don’t think I ever would have been tasked to find a solution.  Even if this module was created 3 years ago it doesn’t seem to have hit the community from what I could tell.  Hopefully that presentation that we did will be on our Youtube channel in the near future and I’ll link it here.

But here’s some example scripts I came up

  • Below creates a new Instant Clone pool with a Pool Name based upon the Pool + Date and Time.  This kind of gives it the random name since you cannot have two pools with the same name.  You can have the same Description so be sure to change that something your customers will see when to launch the pool.  The final step is add the user/group entitlement.

$hzDomain = “your-AD-Domain.net”
$hzConn = “your-ConnectionServer.net”
$vc = “your-vCenterServer.net”

# Import the Horizon module
Import-Module VMware.VimAutomation.HorizonView
#Get-Module -Name VMware* -ListAvailable | Import-Module -WarningAction SilentlyContinue

# Establish connection to Connection Server
$hzServer = Connect-HVServer -server $hzConn -Domain $hzDomain

# Assign a variable to obtain the API Extension Data
$hzServices = $Global:DefaultHVServers.ExtensionData

# Retrieve Connection Server Health metrics
$hzHealth =$hzServices.ConnectionServerHealth.ConnectionServerHealth_List()

# Display ConnectionData (Usage stats)
$hzHealth.ConnectionData

# Establish connection to vCenter Server
$vcServer = Connect-VIServer -server $vc

$dt = get-date -format “MM-dd-yyyy hh:mm”
$date = get-date -format “MM-dd-yyy”
$Pool = “W10-IC-Blast”
$PoolName = $Pool + “-” + $date
$Parent = “Win10-Baseline”
$Snap = “Script Snapshot $dt”
$VMFolder = “VDI”
$Cluster = “vSAN Cluster”
$RPool = “VDI”
$DStore = “vsanDatastore”
$PoolDispName = “IC using PShell”
$NamePat = “w10-blast-{n:fixed=3}”
$Domain = “iamware”

# Take a new snapshot of the parent
$dt = get-date -format “MM-dd-yyyy hh:mm”
$Snap = “Script Snapshot $dt”
get-vm -Name $parent | new-snapshot -name $Snap

# Instant Clone pool with HTML Access and Auto Log off @ 10 Mins
New-HVPool -InstantClone -PoolName $PoolName -PoolDisplayName $PoolDispName -Description “IC created via Script with HTMLAccess and Auto Logoff” -UserAssignment FLOATING -ParentVM $Parent -SnapshotVM $Snap -VmFolder $VMFolder -HostOrCluster $Cluster -ResourcePool $RPool -NamingMethod PATTERN -UseVSAN $true -Datastores $DStore -NamingPattern $NamePat -NetBiosName $Domain -DomainAdmin root -EnableHTMLAccess $true -AutomaticLogoffMinutes 10

# Add AD group to pool entitlement
New-HVEntitlement -ResourceName $PoolName -User ‘yourAD\groupName’ -Type Group

  • Update an existing IC Pool by selecting the parent VM with the “-parent” in the name so you can copy and paste which one to create the snapshot with the name of the current Date and Time.  The script then uses that snapshot name to push the updated image to the selected IC pool.

$hzDomain = “your-AD-Domain.net”
$hzConn = “your-ConnectionServer.net”
$vc = “your-vCenterServer.net”

# Import the Horizon module
Import-Module VMware.VimAutomation.HorizonView
#Get-Module -Name VMware* -ListAvailable | Import-Module -WarningAction SilentlyContinue

# Establish connection to Connection Server
$hzServer = Connect-HVServer -server $hzConn -Domain $hzDomain

# Assign a variable to obtain the API Extension Data
$hzServices = $Global:DefaultHVServers.ExtensionData

# Establish connection to vCenter Server
$vcServer = Connect-VIServer -server $vc

# List all pool summary
Get-HVPoolSummary * | format-table -AutoSize

$dt = get-date -format “MM-dd-yyyy hh:mm”
$date = get-date -format “MM-dd-yyy”
$PoolName = Read-Host -Prompt ‘Input your pool name’

# List VMs with Parent in the name
Get-VM -Name *-parent

$Parent = Read-Host -prompt ‘Input parent VM name’
$Snap = “Script Snapshot $dt”
$VMFolder = “VDI”
$Cluster = “vSAN Cluster”
$RPool = “VDI”
$DStore = “vsanDatastore”
$PoolDispName = “IC using PShell”
$NamePat = “w10-blast-{n:fixed=3}”
$Domain = “YourAD”

# Update IC with new image
$dt = get-date -format “MM-dd-yyyy hh:mm”
$Snap = “Script Snapshot $dt”
get-vm -Name $parent | new-snapshot -name $Snap
start-hvpool -schedulepushimage -pool $PoolName -LogOffSetting FORCE_LOGOFF -ParentVM $Parent -SnapshotVM $Snap

  • This last script example deletes an Instant Clone pool by listing them all and then you can copy and paste.

$hzDomain = “your-AD-Domain.net”
$hzConn = “your-ConnectionServer.net”
$vc = “your-vCenterServer.net”

# Import the Horizon module
Import-Module VMware.VimAutomation.HorizonView
#Get-Module -Name VMware* -ListAvailable | Import-Module -WarningAction SilentlyContinue

# Establish connection to Connection Server
$hzServer = Connect-HVServer -server $hzConn -Domain $hzDomain

# Assign a variable to obtain the API Extension Data
$hzServices = $Global:DefaultHVServers.ExtensionData

# Establish connection to vCenter Server
$vcServer = Connect-VIServer -server $vc

# List all pool summary
Get-HVPoolSummary * | format-table -AutoSize

$PoolName = Read-Host -Prompt ‘Input your pool name’

Remove-HVPool -HvServer $hvConn -PoolName $PoolName -DeleteFromDisk -Confirm:$false

I hope these help you start automating your daily/weekly/monthly processes to free up time to do other new functions or at the very least make sure settings and processes are consistent.

Home Lab – Rename AD Domain

When I first built my home lab I was using a .local address but I wasn’t too happy with it after a year. I bought a domain and slowly getting around to renaming and making it more “prod” like so I can sleep at night. Or I just was bored with my homelab and wanted to change something. I did a domain name change many years ago at one of employers. The steps are easier but basically the same.

My steps since I am on vSphere 6.7U2 and Server 2018:

  1. Unjoin vCenter from Domain and reboot

2. Created the new DNS Zone for the new domain and copied the A records

3. Ran the rendom commands and rebooted all MS servers and desktops twice to verify the domain name change.

4. Renamed vCenter hostname (unsupported in 6.7U2).

5. Put one of the three hosts in maintenance mode, then disconnected that host from vCenter and removed the disconnected host.

6. SSH’d into IP of host that was removed, changed the hostname and rebooted.

7. Once host was back up I then needed to revert the network back to a standard switch so I can re-add back to the DVS. Reboot.

8. Added host based upon the new FQDN to vCenter to the vSAN cluster. Left in Maintenance Mode.

9. Added host back to DVS as a new host and setup the vmkernels (Managment, vMotion, vSAN) back to the port groups and IPs as previously assigned.

10. Ran a check against vSAN and verified all as well.

11. Exit host from Maintenance Mode and verified a VM can vMotion to it without losing connectivity.

12. Repeated steps 5-11 for next two hosts.

My next goal is to fix my Horizon Connection Server and setup a UAG then wrap up with new certificates. I’ll follow up with a blog post about how that comes along. Hopefully not years later like my previous post.

– Never Stop Learning!

(Even if you break stuff first)

Recently Sunny Dua posted internally and on his public accounts (@Sunny_Dua on Twitter) about some new dashboards for vROPs that will show you the performance impacts related to Spectre/Meltdown.  These are very essential that I recommend you also read up about it from the VMware offical blog site.

My homelab is just a small setup consisting of three Intel NUCs Series 7 running the i3 CPUs.  Just something that gives me a chance to run a couple VMs per host and still get that hands on feeling.  I figured there wouldn’t be much to do hardware wise for now but there have been for the VMware bits.  (Some may have been pulled due to reasons that you should reach out to your account team or TAM to get the info.)

If you currently don’t have vROPs, get the trial and check this out!

 First dashboard – CPU Bug – Performance Monitoring

CPU Bug-Performance Monitoring

  • This dashboard will give you a quick glance over your vSphere environment which will come in handy if you’ve already did the hardware patches to see the impact overall.
  • You can also drill down cluster level (I only have the one) but you can see the CPU demand and CPU contention graphed in an easy to read and understand format.
  • Last is per ESXi host in the selected cluster and then it’ll list the VMs with more than 8 vCPUs and their usage of those with 5-8 vCPUs (I have none).  This will come into play after for patching.

Second dashboard – CPU Bug – vSphere Patching

CPU Bug-vSphere Patching

  • This doesn’t show much for my setup since I’ve already deployed the ESXi patches but you will notice the Lab vCenter is showing there is a patch available for it.
  • Your VM Hardware version comes into play when you install patches that require at the least VM HW version 9 to support vMotioning. As you can see I need to upgrade several VMs myself.
  • This will also show which hosts have been patched per VMware’s recommendation.

Third and last dashboard – CPU Bug – VM Patching

CPU Bug-VM Patching

  • This last dashboard will give you the performance per VMs to help you determine which server to do OS level patches.
  • Work on the idle VMs first (unless you don’t have any like I’m showing) and the heavy CPU hitters last.

Side note – I did just patch that vCenter Appliance.  The VAMI is so slick that it was done before I even finished typing this post up.

Career Opportunities

For the last 14 years, I have been working in higher education at two different places.  I built my IT foundation at OCCC and moved on to OUHSC to further my career opportunities.  I rarely had my hands in the firewall or networking before the move but now I can say I have experience with Juniper firewalls and Cisco Nexus switches to say the least.  But the key to changing careers is being able to learn from others and hopefully spread some of your knowledge too.

At OUHSC, we had a Top 70 list of different tasks that we did in a flat operational structure.  Being able to train others on how to maintain a VMware shop was my duty as well as providing customers a great and stable environment for their services.  Then we started this Shared Services model of bridging the three campus into one virtual data center.  I presented at VMworld ’13 as well as a local conference for higher ed institutions on what we designed and created.  It’s been awesome building this platform that stretches across boundaries of teams then teaching them how to run it.  In my six years here I have been blessed in all aspects, my peers that created strong friendships and how well the leadership listened and took care of my family while giving me the chance to keep my passion going with virtualization. (Even let me host the OKC VMUG on campus because it was a great way to reach others.)

I was introduced to the VMware TAM organization last year when I applied for a position that ended up moving to Denver.  My leadership knew that I was interviewing because I was honest with them, they treated me fairly so I felt I should too.  Well another TAM position opened but this time it was SLED (State, Local and Education) based in Oklahoma.  Right up my alley right? 

Well my last day at OUHSC is now July 9th, three days after starting there six years ago.  And Monday, July 13th, I will start at VMware as a TAM based out of OKC.  It’s been fun and I will keep on preaching what Shared Services is doing in the private cloud space for higher education.  They are leading where others are just talking.

Now how do I legally change my name to Victor Michael Ware? 😉

Monitoring VMs FTW!

Recently I had to help figure out why some customers have been getting slow performance with VMs.  Reservations were used but didn’t help.  What did I do to find the issue?  We are a VMware shop using vCloud Suite Enterprise which gives us vCenter Operations Manager (has a new name but I will always call it vCOPS) and the ability to use custom dashboards.  Sadly I did not have it setup to use LDAP nor shared dashboards.  After getting it going so our Operations staff can login and see the TOP-N graphs as well as the vCloud Director dashboards, I started seeing off the bat several high CPU Ready% VMs.  Wasn’t too long that I was able to see that the VMs were hammering the vCPUs but the default Pay-as-You-Go organization setting in vCD is limiting the vCPU speed to 1GHz.  No wonder right?  The problem is that you have to make that change in the VDC of the organization and then restart the vApp.  Not something you can do just in the middle of the day.

Like below I created a dashboard for our biggest customer so they can see how their environment is doing.

high-CPU-Ready

Notice that the top VM is at 31.5% CPU Ready.  The issue is that this VM is in vCloud Director with the vCPU limited at 1GHz.  Changed it to 4GHz but we cannot reboot this VM in the middle of the day so I removed the limit within vCenter.

high-CPU-Ready1

You cannot tell since I blurred out their VM names but the one that was being limited is now off the list.  This is actually the 2nd VM in the first picture that’s now at the top.

high-cpu-ready3

The above is right after I removed the limit.  Notice the spike to just above 3,750MHz for this 2vCPU VM.  Since they have 2vCPU they were able to hit 2000MHz (1GHz x 2vCPU) but the demand was more at this time.  They could have added more vCPU’s but then we could run into other issues of too many vCPUs per host if that was the stance.  Now I’m not saying the high CPU Ready% is always going to be this case, it could be the we need to right size VMs across the board and maxing out the hosts so there’s a CPU wait going on.  So use what you can and monitor it as often as you can if you are providing services to customers.  This is one case where I was able to find a problem before the customer reported it.  That’s a win in my books!


I am sitting on the flight back home from VMworld and listening to podcasts from the conference. Seems the biggest deal was EVO:RAIL/RACK coming out. At first when I heard about Nutanix two years ago, I didn’t see them being an enterprise ready but man has the area grown.

Enter in Simplivity, I met with the local reps about 4 or so months ago and got to see what they are doing in this hyper-convergence market (like Nutanix and now EVO) and got to say I was impressed. One because they used Dell servers, which is a big partner of ours, but importantly all the functionality they have built in to their product. I had Nutanix sponsor our OKC VMUG last month and next Simplivity on October 24th, so it will good to see the differences. I highly recommend you to research them both so I don’t show bias here.

But why would you go the hyper-convergence route in your data
center? For me lately, I have been tasked to architect building blocks for both server and VDI environments. I totally see these three (Nutanix/Simplivity/EVO:RACK) be the path for VDI. One, each bring their own storage solutions so I can keep the IOPs off our primary storage (cause man Oracle is crazy needy!). And two, they make it easy to say “you need 100 VDIs, you need one of these..” and grow accordingly.

This doesn’t mean they suck at server VMs but I don’t need additional storage for those right now. Most of us already have that, but if you are building new look at them. Save rack space, power, cooling, and network ports by going this way in your virtualization environment. Each have limitations and functionality that the other don’t have but don’t want to start a vendor war.

Now my question, would you switch?